Instructions that cover the basics of most WordPress websites that we have designed and built are here:
www.hamiltrowebsitedesign.com/basic-wordpress
Site Overview
Edit Your Content
For your site, you’ll find in many places that when you are logged in, there is a little “edit” link below the content that will take you directly to the page or post for that content.
On your site pages, you will see on the top toolbar a link that says “Edit (Page/Product/etc.)”. This will also let you edit whatever content is located on that particular page.
Accordions
Accordions are included in your theme and can be auto-generated by the following steps:
Revised Master Class Instructions (7/5/24)
To create a variable product with one or more variations:
(eg creating variable product for a class—either for classes with kit or no-kit—or even if the kit is mandatory. This is required to enable the price for class+kit to be calculated for checkout as the combined price of class + kit is set in the variation prices.)
- Create a new product or edit an existing one in WooCommerce.
- In the “Product data” section, select “Variable product” from the dropdown menu.
- Go to the “Attributes” tab and add or select a custom product attribute
For example, “Kit”. - Select or create a term for each attribute, such as “Kit” or “No “Kit” or “Kit (required for this workshop)”
- Make sure to check both “Visible on the product page” and “Used for variations” boxes.
- Click “Save attributes”.
- Navigate to the “Variations” tab.
- From the dropdown menu, and either choose to add them manually or select “Create variations from all attributes”, click “Go”, then delete the ones you don’t want to use.
- You should now see one or more variations created based on your attributes.
- Expand each variation and set the price, which should include the class cost plus the kit cost.
- Fill in other details as needed, such as SKU, stock status, and description.
- Do not check “virtual” product if a kit needs to be shipped (or the client may not be required to fill in their shipping address at checkout)
- Click “Save changes” at the bottom of the page.
- Update or publish your product.
***** For now, sales tax on the kits for California registrants is being deducted by Bette manually, as the kits are the only part of the product that requires sales tax to be added.
*****As a workaround (Master classes having been previously set up with two levels of index pages and discounts for taking multiple classes), single master classes are now created by:
(i) creating each master class as a variable product (even if the kit is mandatory and so only one variation)
(ii) creating a child page for each master class (under “Online Master Classes” page) with the same name as the class product and creating a button in the main content field that links to the single class product page. You can find the add-button option in the little pop-up window that appears when you click the “+” sign to add a new block element to your page content. You will need to add the url to the button’s link destination field.
Regular Posts and Pages (Gutenberg Editor) :
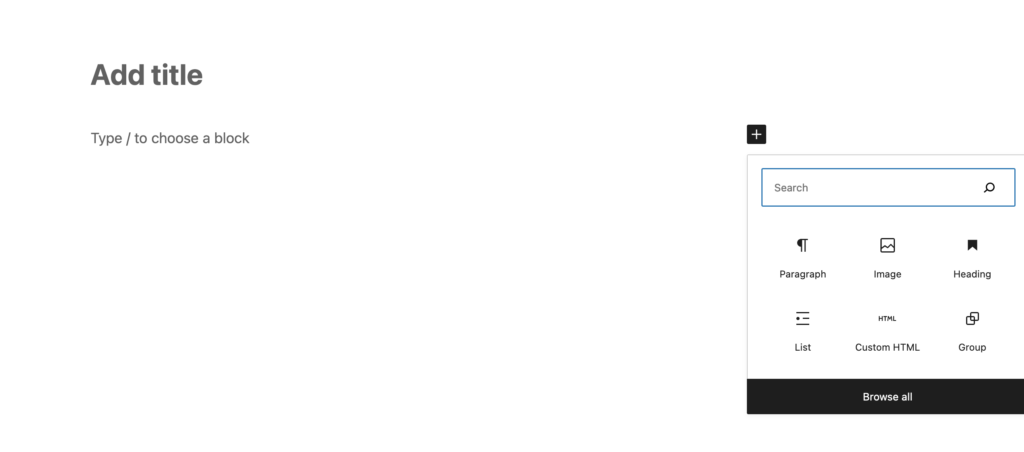
The Gutenberg Editor, also known as the block editor, works by adding “blocks” of text, images, etc. to your post/page. It looks like this:
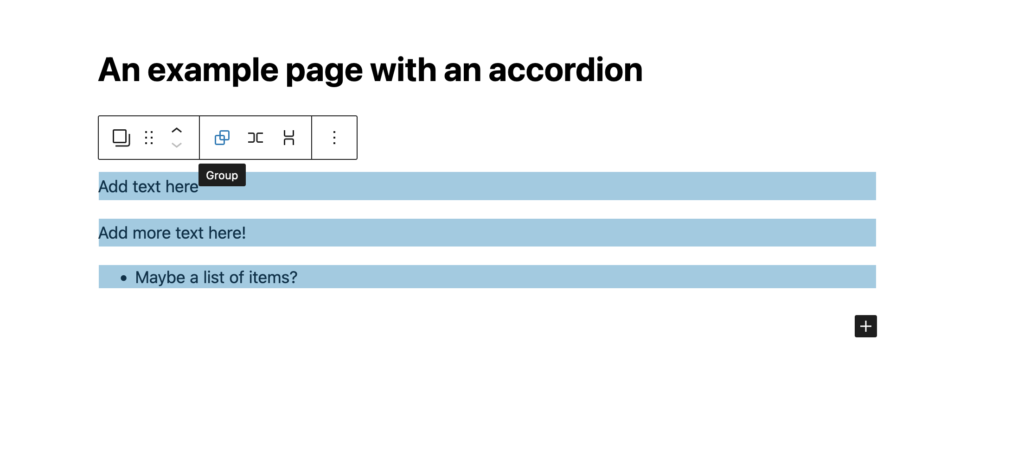
To add an accordion in this editor, first create a heading. Make sure this heading is an h4 heading. **
Then, add any blocks you would like in this accordion directory below your heading.
Next, if you want more than one block/paragraph in the accordion, you will need to group your blocks. Simply highlight the text, and click group.
That’s all you need to do!
** To see an example of this in action, go to your online classes page editor.
Original WordPress Editor (Products)
For your products, you will need to do this same process in the original WordPress editor, as WooCommerce is not yet compatible with WordPress’ Gutenberg editor.
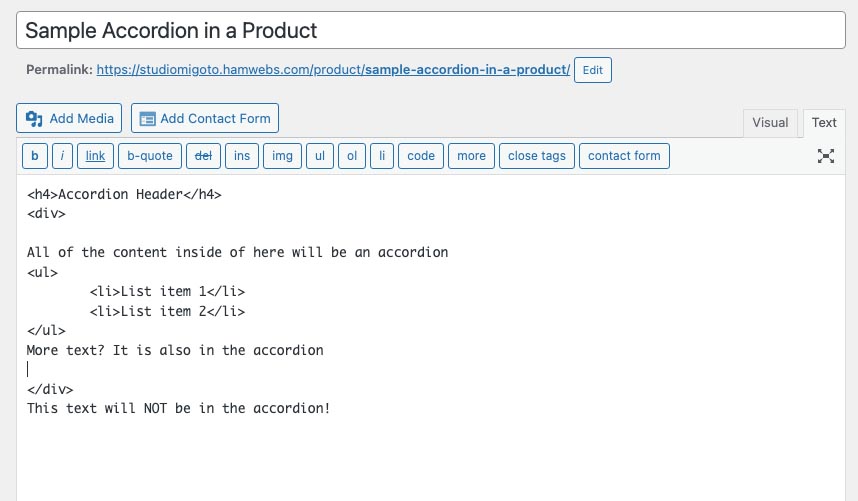
The beginning of the process is the same. You will need to create a new product, an h4 header, and then add any text you want in the accordion below. It should look a bit like this:
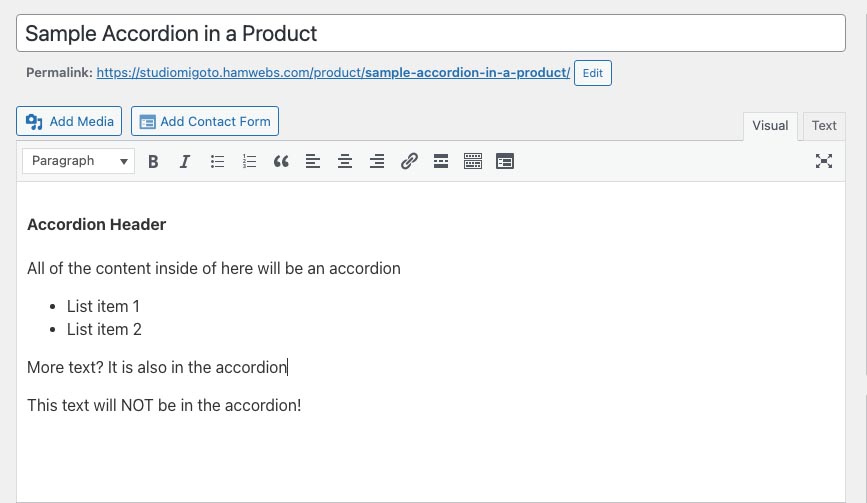
However, like with the Gutenberg Editor, you will need to group your accordion content together. Since groups are not available in this editor, you will need to toggle from the visual to the text editor tab and add an html element to the code. It will be a <div></div> element and should wrap fully around all of the content you want. Please see the image below as an example:
That is all for the original editor. To see examples of this already live, look at your current product single pages.
** h4 headings should ONLY be used for accordions.
WooCommerce
Your site’s particular layout is dictated by WooCommerce, which allows for secure e-commerce functionality on WordPress. There are some WooCommerce-specific settings covered here, as well as configurations specific to your site and your needs.
Product Categories
Your products are currently configured to accept two different categories of input:
- Instruction + Subcategories, eg. Online Classes
- Jewelry + Subcategories, eg. Brooches
You can view your products under the ‘Products’ tab in the WordPress Admin. You can view and add categories under the ‘Categories’ tag, which is a sub-tab of ‘Products’. To make an item a sub-category, or ‘child category’, select a parent when creating a new category.

Categories will determine where you products will appear on the site, and also the metadata options you will have. More on that is below.
Adding, Editing, and Managing Products
To add a new product, click “Add New” in the products tab. The process is very similar to creating a new WordPress post or page: you will be taken to an editor where you can enter in information, and then you will publish or save the product to display it on your site.
You can also add products once they are published, or move them to the trash (delete them).
Your products come with custom meta fields, which are simply additional places to put product information. When you click ‘Add New Product’, you will see an editor that has placeholder text ‘Long Product Description Goes Here’, where you can add long-form text about that product, and a box below that with product information. You will also see a sidebar where you can select what category you want for this product.
Once you select a product category, a meta box will appear below the main editor box. There are separate meta boxes for Jewelry and Instruction, regardless of what subcategory you select. These fields are optional, meaning you can choose to fill them out or not, with two notable exceptions.
- Your product is a class. Classes on your site are ordered by start date, so you will need to select a start date if you want the class is display correctly. End dates are not necessary.
- These dates will not display on your site, instead please use the date description to enter your dates in whatever format is appropriate for that class. This gives you the most flexibility over how you want your dates to show up on your site, and will not affect the class order.
- Your product is a class with an external sign-up system, i.e. you do not handle class sign-ups. If this is the case, you will want to add the full url with (https://www…) of the external sign-up website under the ‘Full URL’ meta field.
- If this field is left blank, nothing changes, but if there is a URL present, your users will be redirected to that site when they click on your product.
Next, you can add featured photos to your products. You will see on the sidebar of your product pages that there is an option to upload a product image or product gallery.
- The product image will be your product thumbnail image. If there are no photos in the gallery, this will be the image of your single product page as well.
- The product gallery is an option if you have multiple product images. You can upload multiple photos, and the user will be able to look through them all on your product single pages. Please note that if there are photos in the gallery, the user will only see your product thumbnail on the single pages if you have also added it to the gallery (and it’s best to add it at the beginning, so it is the first image users see).
Pricing / Price Variations
You need to give your products a price if you want them to be purchasable. There a few different options for this, depending on your needs. The main settings for your current product configuration are below.
- Simple Products: These are products with a set price, like Jewelry.
- Variable Products: These are products that may have different variations, like classes with/without a kit. These can be set to have different pricing options depending on what option your users select.
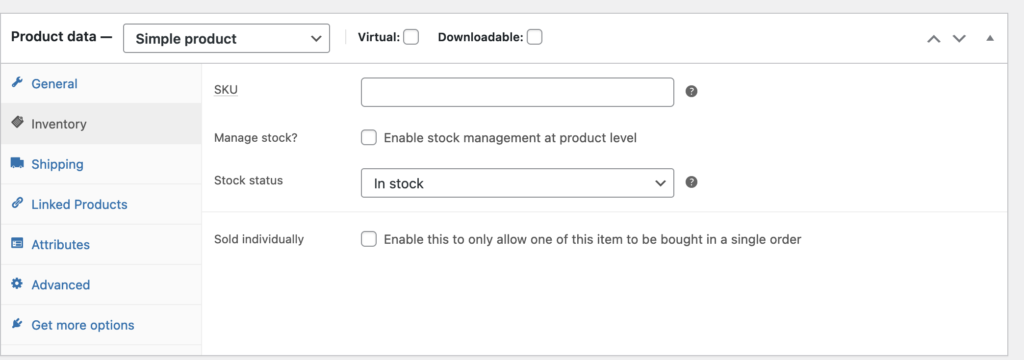
Simple Products
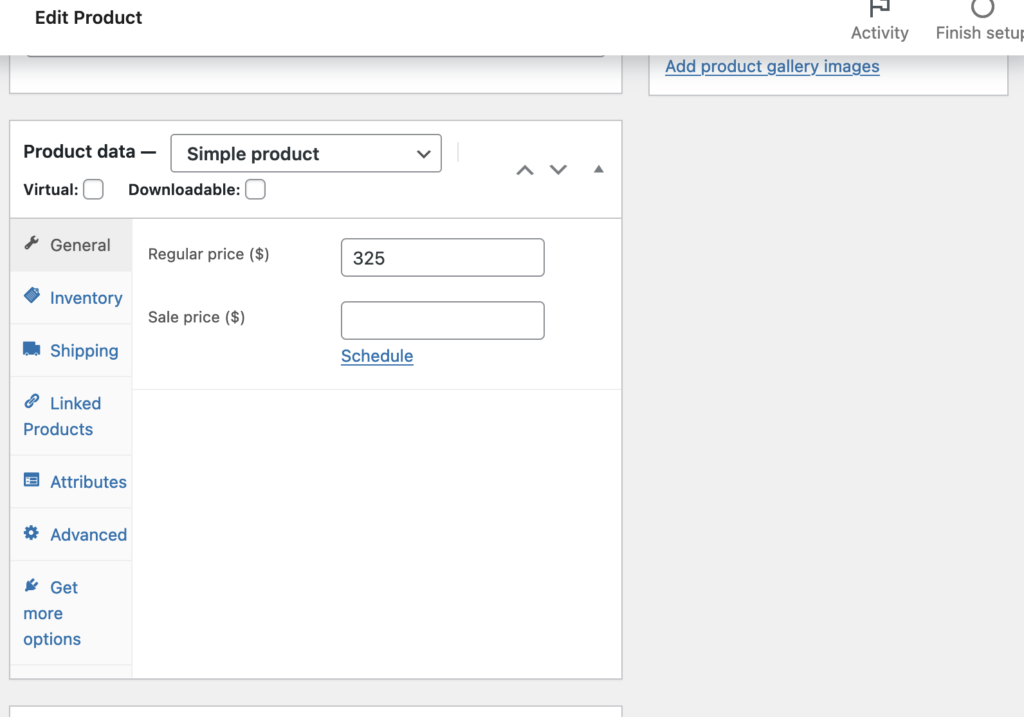
To set up a product like Jewelry, navigate to the ‘Product Data’ box at the end of your product editor. The default product type is ‘Simple Product’, so you can keep that selected. Under ‘General’ you will see a price text field. You can enter the price of the product there. You may also enter a sale price.
** Please note that for a non-physical product like a class without kit, you will want to select the box that says ‘Virtual’ right underneath the product data heading.
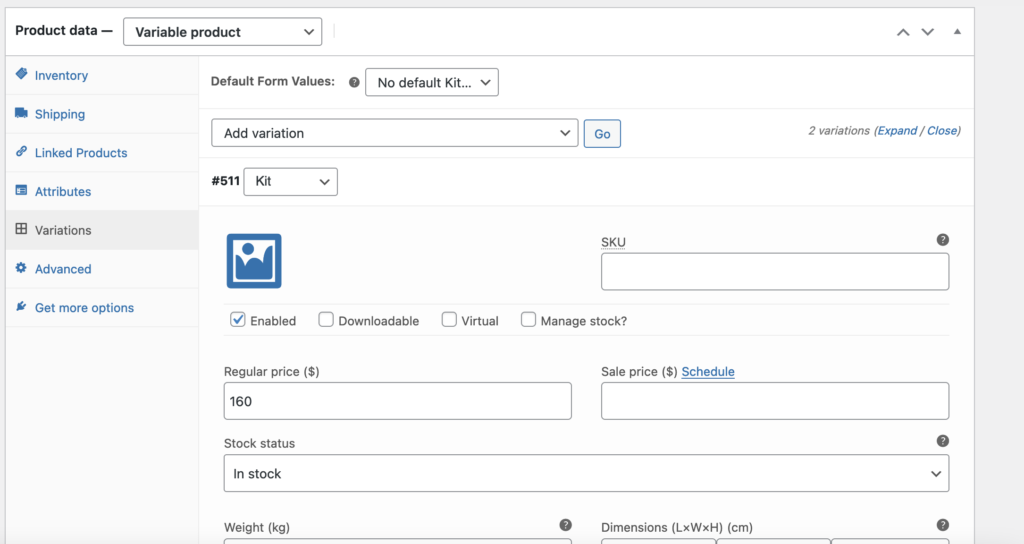
Variable Products
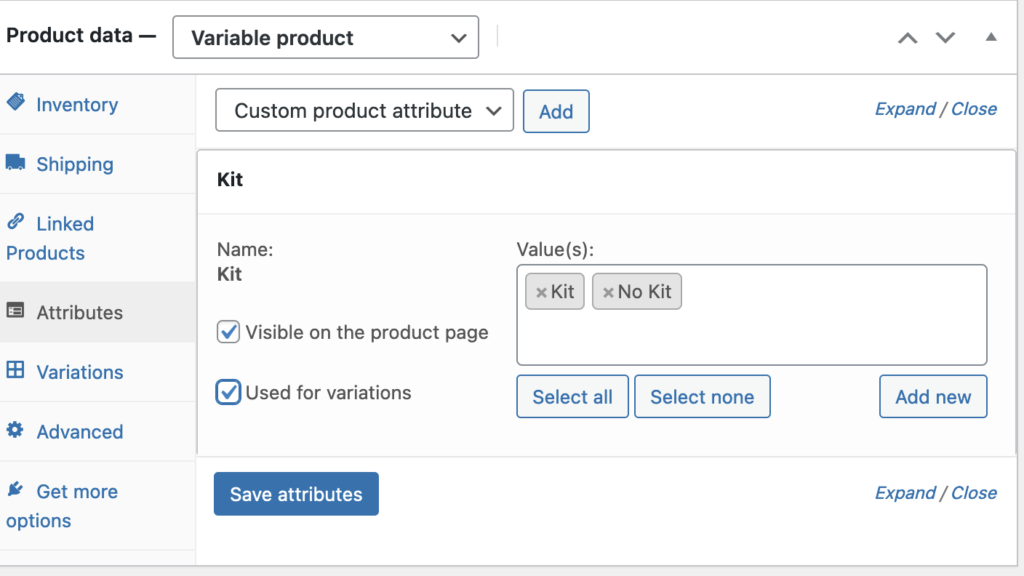
To set up classes that have kits, there is a slightly more involved process. First, you will want to navigate to the product data box, and switch the product type to ‘Variable Product’. Once you do this, go to the ‘Attributes’ sub-tab in the same box. You should see the following selection:

Click on the selection menu that says ‘Custom Product Attribute’, and choose the option ‘Kit’.
This attribute is “global”, meaning its settings are the same for all of your products. You can manage the attribute in the ‘Attribute’ sub-tab under products.
Add the kit attribute, and make sure to check the box ‘used for variations’. You also will need to add values for the product. There are two available: ‘Kit’ and ‘No Kit’. Add both and save the attribute.
Then, go down to the variations tab on the same box. You should see an option in the selection box that says ‘Create Variations from all Attributes’. Choose this option and click go. WooCommerce will auto-generate both variations for you. You will then see two new variations – kit and no kit.
There are three things you need to make sure of when you generate these variations.
- Set your price for each variation (eg the price for class+kit for “Kit” and the price for class-only for No Kit”)
- Set whether the option is in stock – default is in stock
- Set whether the variation is virtual or not. Kits must not be selected as virtual, or else users may not be prompted to add their shipping information when purchasing.
Create variations for kit and no kit. The user will then be able to choose either option.

Then you’re all done! Simply save your changes for the variations, and your kits are all set up.
Shipping Costs
Shipping is currently set to a flat $10 for all customers. You can change these settings in WooCommerce settings. Go to the WooCommerce tab in admin, and then go to ‘Settings’. You should see a tab that says ‘Shipping’. There are two zones set up for now: U.S customers and customers located outside of the U.S. Both are set to Flat Rate. If you click on either of these options, and then on Flat Rate, you can re-configure the prices. For all shipping options, Woocommerce has a nice reference manual: https://woocommerce.com/documentation/plugins/woocommerce/getting-started/shipping/core-shipping-options/
Sales Tax
The system will, by default, add sales tax unless (for example for classes) you manually mark the product as non-taxable.
Managing Inventory for Jewelry
If you set the stock quantity to “1” and check both “Manage Stock” and “Sold Individually” (see screenshot below), WooCommerce will remove the option to order the product as soon as the first order has been placed.
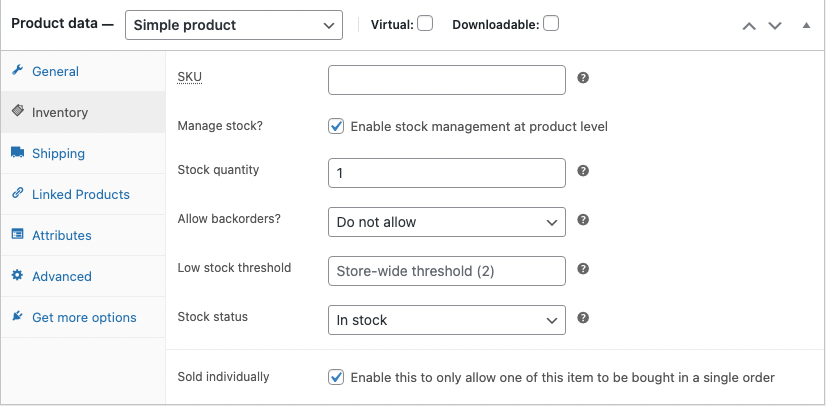
A piece that has been purchased will then automatically display on the website a notice that “this particular piece has been sold”. See screenshot below:

Hiding Unwanted Products
For classes that have already happened (or jewelry that has been sold), you may want to remove these products from the website completely (classes will not automatically display differently when they are in the past).
We have set preferences in WooCommerce settings to hide any products that are marked “out of stock”. If you want to hide a product completely, simply mark it “out of stock”.
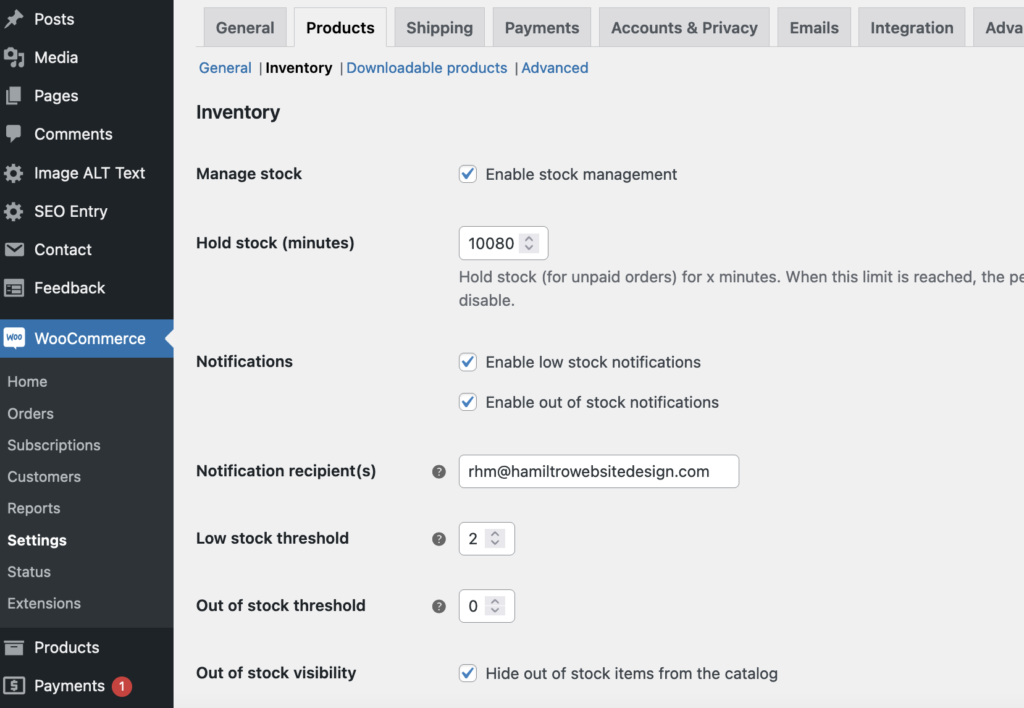
How to mark “out of stock” for both product types:
Adding Master Classes
Master classes have been set up slightly differently from the OLS classes.
First, you will make a child page under “Master Classes” with the title of the new Master Class series. See the original master class series (Wanna Mesh Around? Working with Woven Steel Fusing and Enameling Steel Mesh) for the model. The basic series information will come from this page—including the short description on the parent Master Classes page.
NB While many pages automatically display in the correct template, the parent page for the Master class needs to have “Child Page Detail” specifically selected from the available templates (on the right).
Then create products for each of the classes in this master class series. Give them the category “Master Class” (not “Instruction”) and select the Master Class series title from the drop-down selection.
If you need to offer multiple dates for any of the classes, set that class up as a variable product and create the variable “Dates” with the dates you want (again, use the original master class series as an example).
PROCESSING REFUNDS
If you need to process a refund and the “Refund Amount” field is greyed out, use the fields available next to each item purchased to set the amount (either by number of products for full refunds or directly by amount if partial). The “Refund Amount” will auto-fill with the calculated total.
Then click the “Refund via Stripe” button to issue the refund automatically via Stripe (if you use the manual refund button to use another method, you’ll need to manually update Stripe’s records).
SETTING UP COUPONS
To create a discount coupon, go to “Smart Coupons” and “Add a new coupon”
Enter the coupon name in the title field, select the discount type (fixed amount or percentage) the amount of the discount in the next field and then the start and end dates for the discount to run.
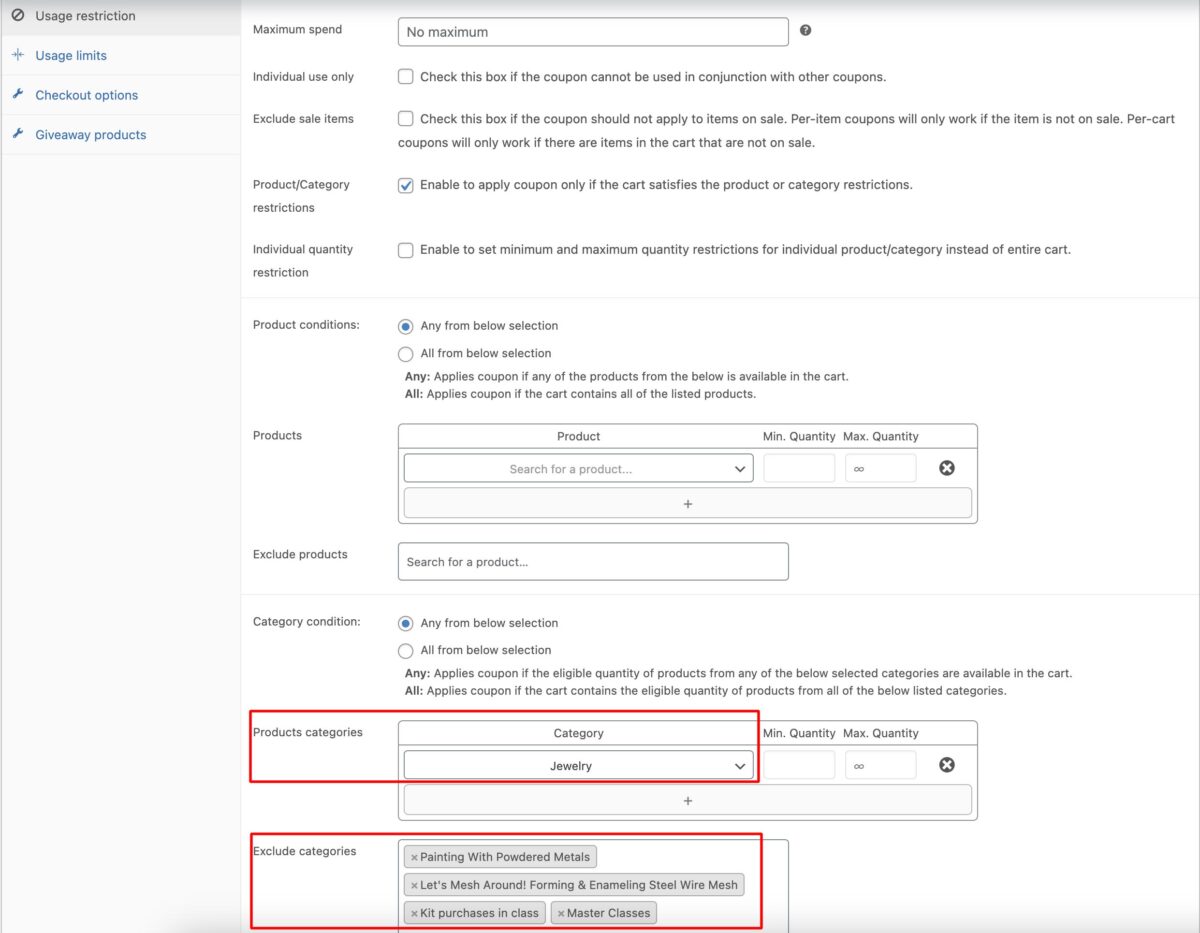
Then go to the “Usage Restriction” tab and, under “Category Condition” select the category(s) to which the coupon should be applied and enter all the categories that should be excluded in the “Exclude” field (by selection). Select “display coupon in checkout”.
Test a product in checkout to be sure it’s working.